Are you ready to take your quesadilla game to new heights? Say goodbye to the traditional stovetop method and embrace the simplicity and convenience of sheet pan quesadillas! This innovative twist on the classic Mexican dish promises not only ease of preparation but also a symphony of flavors that will captivate your taste buds. Let’s explore why this recipe is a game-changer and the benefits it brings to your table.
Why Sheet Pan Quesadillas?
Are you tired of standing over a hot stove, flipping individual quesadillas one by one? Sheet pan quesadillas offer a hassle-free alternative, allowing you to prepare a large batch all at once. Whether you’re cooking for a hungry family or hosting a gathering with friends, this recipe streamlines the cooking process, giving you more time to enjoy the meal and the company.
The Benefits
Convenience
No more juggling multiple pans or worrying about timing each quesadilla perfectly. With sheet pan quesadillas, everything cooks together in the oven, resulting in a stress-free cooking experience.
Versatility
One of the greatest benefits of sheet pan quesadillas is their versatility. You can customize the fillings to suit your preferences or dietary restrictions, making them a crowd-pleaser for everyone at the table.
Easy Cleanup
Gone are the days of scrubbing cheese-splattered stovetops! By utilizing a single sheet pan, cleanup becomes a breeze, allowing you to spend less time in the kitchen and more time enjoying your meal.
Now that we’ve covered why sheet pan quesadillas are a game-changer, let’s dive into the ingredients and steps to create this culinary masterpiece.
Unveiling the Ingredients
Let’s take a closer look at what you’ll need to whip up this mouthwatering meal:
- Olive Oil: A drizzle of this liquid gold adds a subtle richness to the dish.
- Bell Peppers: Chop up these colorful veggies to infuse your quesadillas with a burst of flavor and nutrition.
- Onion: Finely chopped onion lends a sweet and savory depth to the filling.
- Ground Beef: Opt for lean ground beef for a protein-packed punch.
- Spices: Chili powder, cumin, and paprika come together to create a tantalizing blend of Southwestern flavors.
- Salt and Pepper: Season to taste for that perfect balance of flavors.
- Flour Tortillas: Choose large flour tortillas to hold all the delicious fillings together.
- Cheese: A combination of cheddar and Monterey Jack cheese ensures gooey, melty perfection.
- Green Onions: These add a fresh, zesty kick to the finished dish.
- Sour Cream and Pico de Gallo: Classic toppings providing a cool, tangy contrast to the warm, savory quesadillas.
Crafting Your Culinary Masterpiece
Now, let’s delve into the culinary adventure of assembling and baking your sheet pan quesadillas:
Preheat and Prep
Begin by preheating your oven to 425°F (220°C). While the oven works its magic, heat a drizzle of olive oil in a large skillet over medium heat.
Saute Veggies
Add the chopped onion and bell peppers to the skillet and sauté until they’re soft and fragrant, which should take around 5 minutes. Once done, transfer this colorful medley to a bowl and set it aside.
Brown the Beef
In the same skillet, cook the ground beef until it’s nicely browned, breaking it up with a spatula as it cooks. Be sure to drain off any excess fat for a lighter, healthier dish.
Season to Perfection
Stir in the chili powder, cumin, paprika, salt, and pepper, allowing the spices to coat the beef and infuse it with flavor.
Assemble with Care
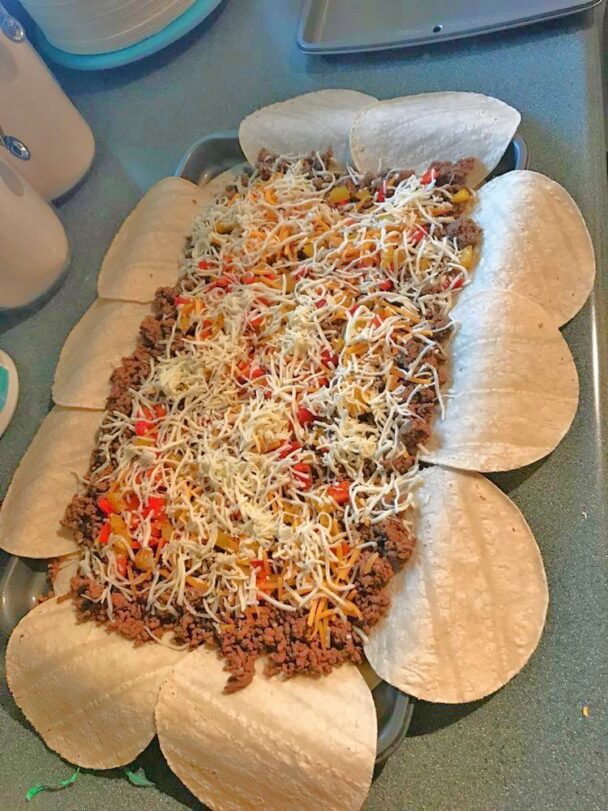
On a large baking sheet, arrange 6 tortillas, overlapping them slightly to ensure they cover the entire surface. Next, layer on the cooked ground beef, followed by the sautéed pepper and onion mixture. Sprinkle generously with shredded cheddar and Monterey Jack cheese, then scatter sliced green onions on top for an extra pop of color and flavor.
Seal the Deal
Carefully fold the tortillas towards the center, creating a neat package of deliciousness. If needed, place an additional tortilla in the center to help hold everything together.
Bake to Perfection
Pop your assembled quesadillas into the preheated oven and bake until the tortillas are golden and crispy, and the cheese is irresistibly melty. This should take roughly 25-35 minutes. If you’ve used a second baking sheet to help hold the quesadillas together, remove it after 10 minutes of baking.
Serve and Enjoy
Once your sheet pan quesadillas are done baking, slice them into rectangles and serve them up warm. Top with a dollop of sour cream and a spoonful of pico de gallo for an added burst of freshness and flavor.
Conclusion: A Culinary Triumph
In conclusion, sheet pan quesadillas offer a convenient and versatile way to enjoy this beloved Tex-Mex dish. With their easy preparation, customizable fillings, and minimal cleanup, they’re perfect for any occasion. So why wait? Elevate your quesadilla game today with sheet pan magic and treat yourself to a deliciously cheesy masterpiece!
FAQs
1. Can I customize the fillings in my sheet pan quesadillas?
Absolutely! Feel free to get creative with your fillings. Try adding cooked chicken, black beans, or even roasted vegetables for a unique twist.
2. Can I make sheet pan quesadillas ahead of time?
While they’re best enjoyed fresh out of the oven, you can assemble them ahead of time and bake them when ready to serve. Just be sure to store them covered in the refrigerator until baking.
3. Can I make sheet pan quesadillas vegetarian?
Definitely! Simply omit the ground beef and add more veggies or substitute with plant-based protein options like tofu or tempeh.
4. How do I reheat leftover sheet pan quesadillas?
To reheat, place them on a baking sheet in a preheated oven at 350°F (175°C) for about 10-15 minutes or until heated through.
5. Can I freeze sheet pan quesadillas?
Yes, you can freeze them! Once cooled, wrap individual portions tightly in plastic wrap and aluminum foil before placing them in a freezer-safe bag. To reheat, thaw overnight in the refrigerator and bake as usual.
